Thursday, August 25, 2011

Mysore Rasam

Rasam/Saaru is an inevitable part of a South Indian Thali. No meal is complete without the Rasam as it is believed to have digestive properties. But I used to hate rasam as a child and could not even stand its smell. It was something very abnormal for a south Indian tamil child in my family and my mother always ended up listing the benefits of rasam after every meal. However, like many things in life, the realisation came after I started living away from home. I craved for this simple soup and when a friend introduced me to "Mysore Rasam" I fell in love with rasam completely….
Mysore Rasam as the name suggests is a Karnataka Speciality. This simple and tangy soup is easy to make and tastes yummm with hot steaming rice and a crisp appalam.

Ingredients

Toor Dal - ¼ cup
Tamarind pulp - 1 tablespoon
Turmeric powder - ½ tsp.
Asafoetida - ½ tsp
Salt - to taste

For the seasoning

Mustard seeds - ¼ tsp
Jeera - ¼ tsp
Ghee - ½ tsp

To Grind

Dhaniya/ coriander seeds - 1 ½ tsp
Bengal Gram - 1 tsp
Black Pepper - 6
Dry Red Chillies - 2
Grated Coconut - 2 tsp


Method
  1. Cook the dhal with 1 - 1½ cup of water and mash it well once its cooked.
  2. Fry the grated coconut in a pan for about 10 seconds or till it turns golden brown in colour and keep aside.
  3. Fry the remaining ingredients to grind for about 10 seconds .
  4. Add the grated coconut and grind to a coarse powder. This powder can be stored in an airtight container for about a week’s time.
  5. Mix the tamarind pulp, turmeric powder, asafoetida and salt to 1½ to 2 cups of water and let it boil for 5-7 minutes in medium heat.
  6. Add the ground masala powder and let it boil for another 2 minutes.
  7. Next step is to add the dhal to the already boiling rasam. Preferably, mix the cooked and mashed dhal to 2 cups of water and add it to the rasam and let it boil for another 2 minutes.
The last and most important part of a rasam is the seasoning. In a small pan, heat the ghee and add the mustard and jeera seeds. Once it splutters and the aroma emanates, add it to the rasam and serve hot.

Friday, June 10, 2011

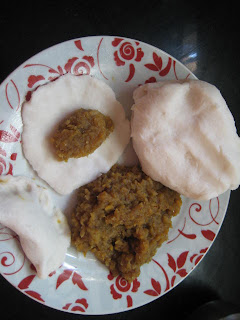
Sweet Kozhukattai/Rice Dumplings with Jaggery and Coconut.

After a small break , I’m back with an age old favourite snack of Tamilians, the "Kolukattai". This is our very own stuffed dumplings which is made during "Vinayaga Chaturthi", Lord Ganesha’s Birthday. They are little steamed rice flour packets with a stuffing inside. There are many variations to the stuffing and the dumplings get the names from the stuffing like Coconut Kolukatai, Kara Kolukatai, Vellam Kolukattai etc.

Today, Im sharing a very simple recipe of a sweet kolukattai after the request of a friend who lives in the US and is planning to entertain his friends with a Tamil Dinner. All the Best for the first timer!!!!

Ingredients
Rice Flour - 1 cup
Coconut(grated) - ½ cup
Jaggery (grated) - ½ cup
Bengal Gram/ Chana Dhal/ Kadalai Paruppu - ½ cup
Cardamom - 5-6
Water - 1 cup
Salt to taste


Method

For the Dough:
  1. In a pan boil the water with 1 tsp salt.
  2. Gradually add the rice flour and keep mixing till you get a firm dough with no lumps.
  3. You can also take the rice flour in a big vessel and add warm water gradually till you get a firm dough with no lumps like the one in the photograph. Both ways work out the same way.
  4.  
For the Stuffing:
  1. Soak the dhal for 1 hour in warm water.
  2. Grind it to a coarse consistency and keep it aside.
  3. Heat ¼ cup of water and add the jaggery to it.
  4. Keep stirring till the jaggery dissolves. The lighter impurities will rise as a foam and others settle down at the bottom.
  5. Filter the now viscous Jaggery and discard the impurities.
  6. Mix the cardamom, coconut, jaggery and dhal in a pan for 4-5 minutes.
  7. Keep aside to cool.
For the dumplings
  1. Apply 1 tsp of oil on your palms and rub well.
  2. Take a small ball from the dough in one hand and press with your thumb of the other hand to make it flat.
  3. Add a small portion of the stuffing and seal the edges.
  4. Steam for about 10 minutes or till a knife inserted in the dumpling comes out clean.
  5. Serve Hot.

Monday, May 30, 2011

www.malli.in , Chennai’s Comprehensive Gourmet Guide

My Son’s 1st Birthday Party was a huge hit, thanks to www.malli.in …..With less than a week’s time for Sanjay’s 1st Birthday, I was frantically searching for Birthday Planners, Banquet halls, Decorators, Cakes, takeaway gifts when I accidentally stumbled upon this website and Life became simple all of a sudden….
An absolutely comprehensive guide with loads of information on Restaurants, Caterers, Party Planners, Florists, DJs, Bartenders and even recipes, “malli” becomes your one stop search engine for food in Chennai. I was completely stunned with the amount of information “malli” has to offer.

Are you looking for a particular type of Cheese and do not know where to buy it….. Malli gives a list of stores where you get different food items…  Tired of reading the same old stories on Kollywood and Bollywood actors, try the “Spotlight” section and get to know the real heroes behind that yummy dinner you relished in the Taj last time. From Cooking classes to the latest updates on new deals and events in Chennai, malli gives you all you need to make your life simple and easy in Chennai.
So, Beat the Heat and don’t run around clueless for anything….. After all, everything is just there in one place for you to choose what you want.

Saturday, May 21, 2011

Vegetable Adai

A slight variation to our usual Adai…. A simple, delicious and a must try dish….


Ingredients

Rice - 1 cup
Toor Dal - ½ cup
Urad Dal - ¼ cup
Dried Red Chillies - 5
Asafoetida / Hing - 1 tsp
Curd - 1 - 2 tbsp
Onion - 1
Carrot - 1
Beans - 3 to 4
Cabbage (Grated) - ¼ cup
Curry Leaves - a few
Coriander leaves - a few
Salt - to taste

Method
  1. Soak the rice and dals for about an hour.
  2. After an hour, drain the rice and the pulses and grind coarsely with Red Chillies, Hing and salt.
  3. The vegetables can be grated or finely chopped or ground. I ground the vegetables coarsely.
  4. Add the vegetables and curry leaves and coriander to the Rice and Dal mixture.
  5. Add the curd to the batter.
  6. If the batter is very thick , add ¼ cup of water.
  7. Pour a ladle of batter on the pan and spread like a dosa.
  8. Cook on Low Flame till both sides become golden brown.
  9. Serve with Butter and Jaggery or Kara Chutney.

Sunday, May 15, 2011

Kung Pao Fish

The Valentine’s day dinner at the Hotel Le Royal Meridien this year will definitely be a memorable evening for both of us. The Candle-lit tables with heart-shaped arrangements of bright red roses everywhere with lovely music and delicious food made it a perfect date. But there was one dish amongst a huge buffet spread that made us go for it again and again, " Kung Pao Yee". Being a curious cook, I just had to walk to the Chef and ask for the recipe and he immediately gave a hand-written note of the recipe. Now, I share it with you.


Ingredients

Fish [ boneless] - 500 gm ; cubed or sliced.
Spring Onions - ½ cup(finely chopped)
Celery - ½ cup(finely chopped)
Capsicum - 1 (cut into medium sized pieces)
Ginger - 1 tsp. (finely chopped)
Garlic - 1 tsp.(finely chopped)
Chilli Paste - 2 - 3 tbsp (adjust according to your spice level)
Soya sauce - 2 tsp.
Vinegar - 2 tsp.
Dried Red Chillies - a few
Fried Cashew nuts - a handful.

To Marinate the Fish.
Egg - 1
Flour - 1 tsp.
Corn Flour - 1 tsp.(optional).
Fish Fry Masala/ Chilli Powder - 2-3 tbsp.
Aji-no-motto - 1 or 2 tsp.
Sugar - 1 tsp or less. ( just a pinch of sugar would do).
Salt - to taste.
 
Method
  1. Marinate the fish after adding all the Ingredients mentioned for 30 - 45 min.
  2. After the Fish is marinated, deep fry the fish cubes, pat excess oil and keep it aside.
  3. Heat the wok and add 2 tbsp of oil.
  4. Add the chopped celery, shallots, capsicum, red chillies, ginger, garlic and sauté.
  5. Ad the Chilli paste, soya sauce, salt, aijinomotto, sugar, vinegar and saute.
  6. Add the Fried Fish and Cashews and saute again for 2 minutes.
  7. Serve and eat Hot.
Note : This dish could also be made with tofu or paneer or chicken.
    Learn from my mistakes!
  • Do not marinate the Fish for a very long time. The Fish could become rough. The moisture of the fish should be retained.
  • Adding a lot of soya sauce makes the dish bitter or sour.Dont overcook the vegetables.

Friday, May 13, 2011

Okra Subji


My husband like many others has a serious " I hate Vegetables" Syndrome and I always end up trying different ways to camouflage the vegetables to a more appealing form for him to even consider tasting. So, when he said "You should definitely add this recipe to your blog", I knew I had hit the mark.


Okra/Lady’s Finger/Vendaikkai was fed to us in kilos as children by my father saying " 100 in Maths Guaranteed!". Now, I cannot assure you if you will really top your mathematics exam by eating a bowl of okra. But it is definitely a common household vegetable loved by many in India. As a variation to our usual vendaikkai poriyal or pachadi, this yummy, creamy subji tastes excellent with Rotis or hot rice.


Ingredients

Okra - 12-15 nos.
Onions - 2
Tomato - 1
Chilli Powder - 2 tsp.
Garam masala - 1 tsp.
Oil - ½ cup
Green Chillies - 1 or 2.
Ginger Garlic paste - 1 tsp.
Cinnamon - 1 little piece.
Fennel - 1 tsp.
Fresh cream - 2 tbsp.
Coriander leaves - to garnish
salt - to taste.

Method
  1. Cut the Okra to medium size pieces. ( approx. 3 pieces an okra)
  2. Sauté 1 chopped onion and tomato until golden brown and grind to make a coarse paste.
  3. Add 1 tsp. of oil to a bowl, 1 tsp. of chilli powder and 1 tsp. of salt add mix well .
  4. *Add the okras to the mixture, mix well and microwave covered for 3 minutes.
  5. Heat a non stick pan or kadai with the remaining oil. Add the spices(cinnamon, fennel), the remaining finely chopped onions, slit green chillies and ginger garlic paste and sauté.
  6. Once the onions turn golden brown, add the onion-tomato paste and sauté. Add the chilli powder, garam masala and the okras and mix well.
  7. Add some water and required salt and cook covered for 5 minutes. Since the okra is almost cooked in the microwave, it wont take a long time to cook. Once the gravy thickens, add the fresh cream and stir for a few minutes and the dish is done.
  8. Garnish with coriander leaves on top.
*Tip : I usually microwave the vegetables(covered) for a few minutes while making poriyal or kootu or any subjis. This saves both gas and time and keeps the nutrients of the vegetables intact. The belief that the taste of the vegetables is lost if you microwave them separately is absolutely false .

Saturday, May 7, 2011

Carrot Cake


When I was working in Satyam, one of my friend gave me this piece of Carrot Cake and said that I should try it since it was her mom’s Signature dish. I loved the cake for it was light, spongy and had a very unique taste. I had promised to bake it for a very long time but the time was never right. Rather I should say I didn’t have the confidence to reproduce that delicious piece of cake I ate long ago. Finally I came across quite a simple recipe in one of the cookbooks I received as a birthday gift and I knew it was time I fulfilled the promise I made long back… So here’s to you Anju for sharing your mom’s yummy carrot cake and to Dums and Viju for gifting me that very handy cookbook.


Ingredients
  • Flour - 2 cups
  • Carrot (Grated) - 2.5 to 3 cups
  • Eggs - 3
  • Butter - 1 cup ( 1 ½ cups oil can also be used instead of butter)
  • Cinnamon powder - 2 tsp.
  • Ginger powder - 1 tsp (optional)
  • Castor Sugar - 2 cups
  • Vanilla - 1 tsp.
  • salt - 1 tsp.
  • Baking Soda - 2 tsp.
Method
  1. Mix the Flour, Cinnamon Powder, Ginger, Baking soda and salt together.
  2. Beat the Butter with Castor sugar and Vanilla essence till you attain a fluffy consistency.
  3. Add the grated carrot to the butter mixture and beat well. We do not want lumps of carrot in the mixture.
  4. Now, Gradually add the mixture to the flour little by little and mix well.
  5. You can add chopped nuts like walnut or almonds to the mixture if you wish.
  6. Preheat the oven to 160° C
  7. Bake in a greased pan for about 30 to 40 min or till a knife inserted in the centre of the cake comes out clean.
  8. Cool the cake on a wire rack for 10 minutes and then turn the cake on a turntable or plate.
  9. Serve a slice of the cake with cream …. Happy eating!!!!
Tips :
Remove the butter from the refrigerator atleast 1 to 2 hours before baking to bring it to room temperature. Don’t melt the butter in the oven or a pan.
Do not overbake the cake and lose the moist and sponginess of the cake.